What is CSS animation?
CSS animations are a way to add movement and interactivity to web pages using only CSS code, without the need for JavaScript or other programming languages. With CSS animations, we can create dynamic effects such as moving text and images, colour and font changes, and plenty of other visual touches.
CSS is a powerful tool that is often capable of more than we can imagine. Andy Clarke’s take on the AMC show Mad Men‘s opening credits is a testament to what CSS can accomplish:

Why use CSS animation?
There are several reasons why you might want to use CSS animations in your web design:
- Eye-catching visuals: CSS animations can make your website more visually appealing and engaging for users. Animations can help to draw attention to important elements on the page, and create a sense of interactivity that can make the user experience more enjoyable.
- Improved user experience: Animations can also be used to improve the user experience by providing visual feedback when a user interacts with a particular element on the page. For example, when a user hovers over a button, the button might change colour or move slightly, giving the user a sense of feedback that their action has been registered.
- Cross-browser compatibility: CSS animations are supported by all modern browsers. Older browsers can be accounted for with vendor prefixes, which we will cover later on.
- Performance: Because CSS animations are native to the browser, they tend to be faster and more efficient than animations created using JavaScript. This can help to improve the performance of your website and ensure that it loads quickly for users. Also, why use the most fragile layer to create animations when we can make them using CSS, the more robust layer?
How to use CSS animation
Before we jump into some animations, let’s take a look at what CSS technologies are available to us and how they work.

The transform property is an extremely useful tool that allows us to move, resize, rotate, and skew HTML elements on the page. It should be noted that while transforms change how the element is displayed, it is does not create ‘movement’ or animation when used by itself. The trick is to combine the transform property with a transition or keyframe animation.
The following functions can be performed with transform:
translate: Relocates the element on the page. This can be done on the horizontal axis with transform: translateX(), the vertical axis with transform: translateY(), or both the X and Y axis with translate().
scale: Makes an element appear larger or smaller. You can provide a ratio with scale, such as transform: scale(1.5). This would make the element 150% larger than its original size.
skew: Changes the angle of the element’s axis by a specified number of degrees, stretching it out accordingly. In other words, it makes the element ‘slanty’. You can do this on the horizontal axis with scaleX(), vertically with scaleY(), or both with scale().
rotate: Tilts the element’s angle clockwise with a positive degree value, or anti-clockwise with a negative degree value. For example, to rotate an element by 45 degrees, you would write transform: rotate(45deg).
Here’s a quick look at how we can apply multiple transforms to manipulate an image of a cloud:

If we wanted to move the cloud to the right, make it smaller, and rotate it slightly, we could write:
The result is a cloud that has been moved 500px to the right, scaled to half its size, and rotated to a 30 degree clockwise angle.

Transitions in CSS are an integral part of animation and are often used in conjunction with the transform property to create smooth and fluid transitions between different states of an element.
Transitions allow you to specify how an element’s property should change over time, and is activated when a user interacts with the element, such as hovering over it or clicking on it. Transitions enable us to control the speed and timing of the change, creating a smooth sense of motion.
The syntax for transitions consists of:
transition: [transition-property] [transition-duration] [transition-timing-function] [transition-delay];
To break it down:
[transition-property]– selects the element property you wish to change
[transition-duration]– the duration of the change in seconds
[transition-timing-function]– how the transition is executed over time
[transition-delay]– an optional delay can be placed on the transition
Here’s an example of a transition applied to an element’s background colour that changes over a 0.3 second period:
transition-property: background-color;
transition-duration: 0.3s;
transition-timing-function: ease-in-out;
That’s all a bit wordy, but we can use shorthand to make our lives much easier:
transition: background-color 0.3s ease-in-out;
Many CSS properties are animatable with transitions. Here’s a handy list of some of them as seen in Jennifer Niederst Robbins’ book Learning Web Design:
However, if we just want a quick, one-size-fits-all for all of our state changes on an element without targeting things like the background colour or width individually, we can use the rather nifty all value for transition-property. This targets all of the changes you make to the element.
transition: all 0.3s ease-in-out;
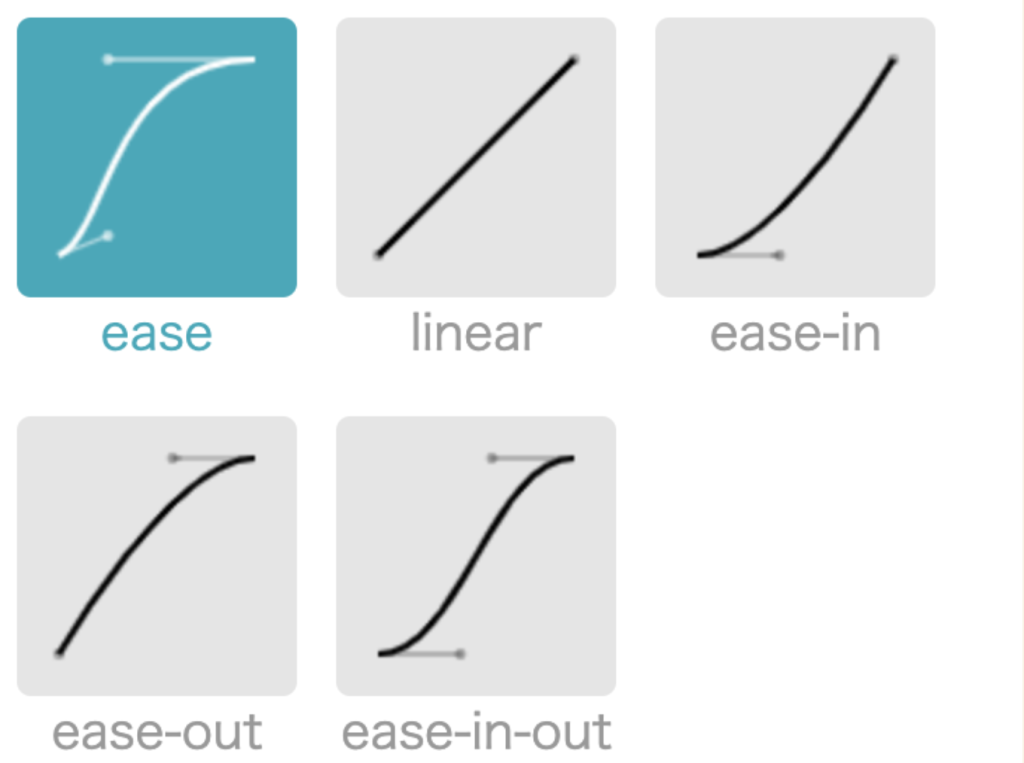
A closer look at the transition-timing-function
The transition-timing-function dictates how the transition speeds up or slows down while it is being carried out. For example, the transition might begin slowly, then pick up the pace through to the end (otherwise known as ease-in). You might prefer it to ease slowly into the transition, speed up in the middle, then slow down towards the end (ease-in-out).
The transition pace can be imagined as following a curve, where it flattens as the pace slows, and inclines as it speeds up. This is known as the cubic bezier.
An example of a simple transition
In this little animation of a car driving along a road, perhaps we want to move that cloud slowly to the left when we hover over it, just to give an impression of some extra movement. We would need to perform a transform on it that translates it on its x axis.

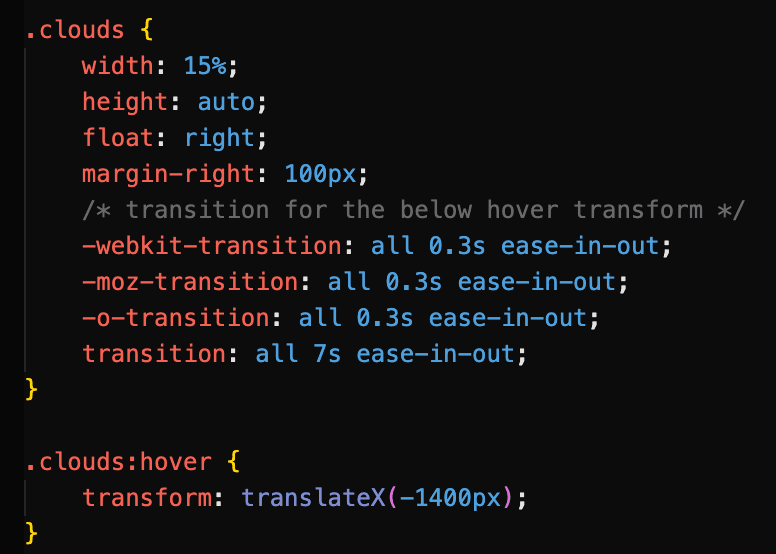
Here we use the transition property to specify that the cloud should move horizontally by 1400px over a duration of 7 seconds. Using ease-in-out, the cloud starts off slowly when we hover over it, builds momentum as it moves to the left, then slows down towards the end of the transition. Note that the transition is applied to the cloud image itself, while the transform property belongs with the triggering event (in this case, .clouds:hover).
Browser support for transitions
Luckily, CSS transitions are supported by most modern web browsers. That said, the level of support may vary depending on the version of the browser, and some older browsers may not support certain CSS animation features. As a general rule, we should not expect to encounter any issues with browser versions released after 2013. To check which browsers support transitions, you can refer to online resources such as CanIUse.com, which gives comprehensive information on the support for various CSS features across different web browsers, including version numbers and any known issues or limitations.
You might have spotted some vendor prefixes in our hovering cloud example code above. Just on the off-chance that someone views your site in an older browser, you can use vendor prefixes in your transitions to ensure that they will run. We can also let someone else do the hard work for us by heading to autoprefixer.github.io, which parses our CSS and generates the vendor prefixes we need to include in our code.

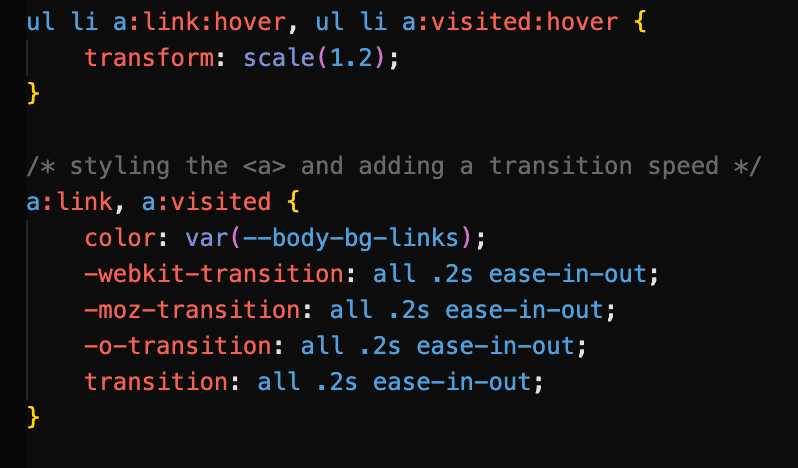
Here’s an example of a transition that uses vendor prefixes to support older browsers. Each link icon has a transform: scale() on hover applied to it with a transition:


Keyframes can be considered animation ‘proper’; they do not need to rely on a user interaction to execute, and can run a certain number of times or even infinitely if desired. Keyframes can dictate exactly how an element’s state changes, and you can explicitly express not just the beginning and end points of the animation, but any part of it in between. Keyframes can be used in conjunction with transforms to produce a variety of effects.
Once the keyframes have been defined, the animation property that references the keyframes can be applied directly to the element you would like to animate. It is easiest to think of the keyframes as an animation ‘script’ that can then be referenced where it is needed.
The syntax for keyframe animations is made up of two parts:
Part 1: Defining the keyframes
@keyframes name-of-animation {
0% { opacity: 0; }
20% { opacity: 1; }
80% { opacity: 0; }
100% { opacity: 1; }
}
After naming our animation, we can define exactly what happens in the animation using percentages, with 0% denoting the start of the animation and 100% signifying the end. In this case, the element’s opacity will change in intervals.
We are not limited to percentages, however, and can simply use the from and to keywords to define the start and end of the animation, as we see in this animation named whoosh that uses transform: translate() to move an element to the left.
@keyframes whoosh {
from {transform: translateX(0) }
to {transform: translateX(-400) } }
Part 2: Calling the animation
.animate-this-element {
animation: name-of-animation 5s infinite;
}
The animation property is then used on the target element to call the defined keyframes and change the state of the element as desired. Above, shorthand has been used to reference the animation name, the animation’s duration, and the number of times the animation will run. In full, the animation properties include:
For efficiency, it is a good idea to use shorthand animation properties. They should also look rather familiar, as they are very similar to transition properties.
animation-name(required) – the name of the animation as specified in the keyframes
animation-duration(required) – usually given in seconds
animation-timing-function– options includeease,ease-in,linear, and all the timing-function values we have already encountered with transitions
animation-iteration-count– how many times the animation should repeat. This can be a number or set toinfinite
animation-direction– this defines whether the animation plays forward (normal), backwards (reverse), or back and forth (alternate). You can also start the animation from the end withalternate-reverse.
A simple example of a keyframe animation
Let’s drive our car from earlier on.

We begin by defining our keyframes. The car is a PNG image that will move from the left to the right of the page by 1500px. We can use from and to to do this:
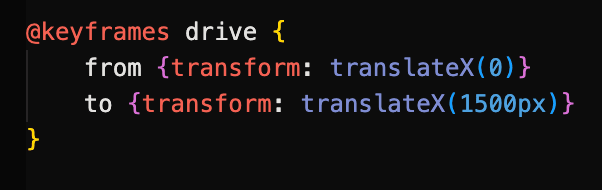
The animation is then called on the car element.

The animation will last for 5 seconds and run infinitely on a loop.
Combining multiple transform properties with keyframe animations
We can combine transforms to create more complex and dynamic effects. In the example below, a sense of movement and perspective is gained in our desert highway scene by combining scale and translate on elements. As they approach the ‘camera’ and get closer, their sizes increase.

The white road marking is moved to the bottom of the page with translateY, and it is scaled up over time. This gives the impression of driving from a first-person perspective.

When we call the animation on our .lines element, we set it to run at a steady pace for 2 seconds with linear on an infinite loop.


View this animation page here.
Working with SVG
SVG elements (Scalable Vector Graphics) are an increasingly popular choice for adding movement to web pages, and can be used with CSS to make simple animations. They can also be animated with the XML language SMIL as well as JavaScript to create more complex animations. However, it would be wise to use SVG sparingly when animating due to poor browser support. Indeed, it is a good idea to consider fallback techniques.
CSS fallback for SVG
In our desert scene animation, the sun is a SVG sprite that changes colour when clicked and hovered upon, using a flipbook-like mechanic where three sun images are combined. However, if the user’s web browser does not support SVG, the animation will not work.
As a fallback, we have set a PNG of the sprite image just before the SVG version in the cascade. This way, the sun will still appear and work as expected, even if an older browser is being used.
More on CSS Animation Fallbacks
There are several types of CSS fallbacks that can be used for animations to ensure that the animation is still presentable and works as expected, even if the user’s browser doesn’t support the animation effect.
Here are some common types of CSS fallbacks used for animations:
- Static fallbacks: These are simple styles that are applied to the element if the animation is not supported. For example, if you have a CSS animation that rotates an element, you might apply a
transform: noneproperty to the element as a static fallback so that it still looks good and is positioned correctly even if the rotation effect is not supported.
- Feature detection: One way to provide a fallback is to use feature detection to determine whether a particular CSS animation effect is supported by the user’s browser. If it is not, you can use a different animation effect or a static fallback instead. This approach requires some additional coding, but can help ensure that your website works as expected for all users.
- Progressive enhancement: Another approach is to use progressive enhancement, where you start with a simple, static design that works for all users, and then add more complex animation effects using CSS and JavaScript for users with newer browsers that support these features.
By using these types of fallbacks, you can ensure that your animations still look presentable and work as expected, even if some users are not able to see the full animation effect. This can help improve the accessibility and usability of your website for a wider range of users.
Things to bear in mind when animating
It’s important to remember that by providing fallbacks, you can ensure that your website is still usable and accessible for all users, regardless of their browser or device.
Next, we may choose to (and probably should) make use of the prefers-reduced-motion media query in our CSS to detect whether users have opted for reduced animation in their accessibility preferences. Many users suffer from motion disorders and other sensory conditions, and we need to account for them in our design.
We should also consider how animation should be used, and how much is too much. After all, while a bit of polish and flair goes a long way, we do not want our website to become a 2002 Geocities page full of flashy graphics and whirling GIFs.
When used with consideration, animations can greatly enhance the user experience and bring some added delight to our web pages.
References
- Seminar slides – https://zaraknox.co.uk/coursework/content-management/slides.pdf
- Chapter 18 of Learning Web Design by Jennifer Niederst Robbins: Transitions, Transforms, and Animation, 5th Edition 2018
- CSS animations – https://developer.mozilla.org/en-US/docs/Web/CSS/animation
- CSS animations – https://css-tricks.com/almanac/properties/a/animation/
- Transform, transition, keyframes and animation – https://www.youtube.com/watch?v=jgw82b5Y2MU&list=PL4cUxeGkcC9iGYgmEd2dm3zAKzyCGDtM5
- SVG Fallbacks – https://css-tricks.com/a-complete-guide-to-svg-fallbacks/